
How to Place Acoustic Panels in a Room Step by Step
You can cover an entire wall with acoustic panels and still hear muddy dialogue, sharp echoes, or uneven bass. Placement matters as much as panel quantity.
This guide explains how to place acoustic panels in a room step by step using a practical workflow: diagnose, position, treat, test, and adjust.
Room shape, furniture, windows, flooring, and equipment position all affect performance. Start with the highest-impact areas before buying more panels.
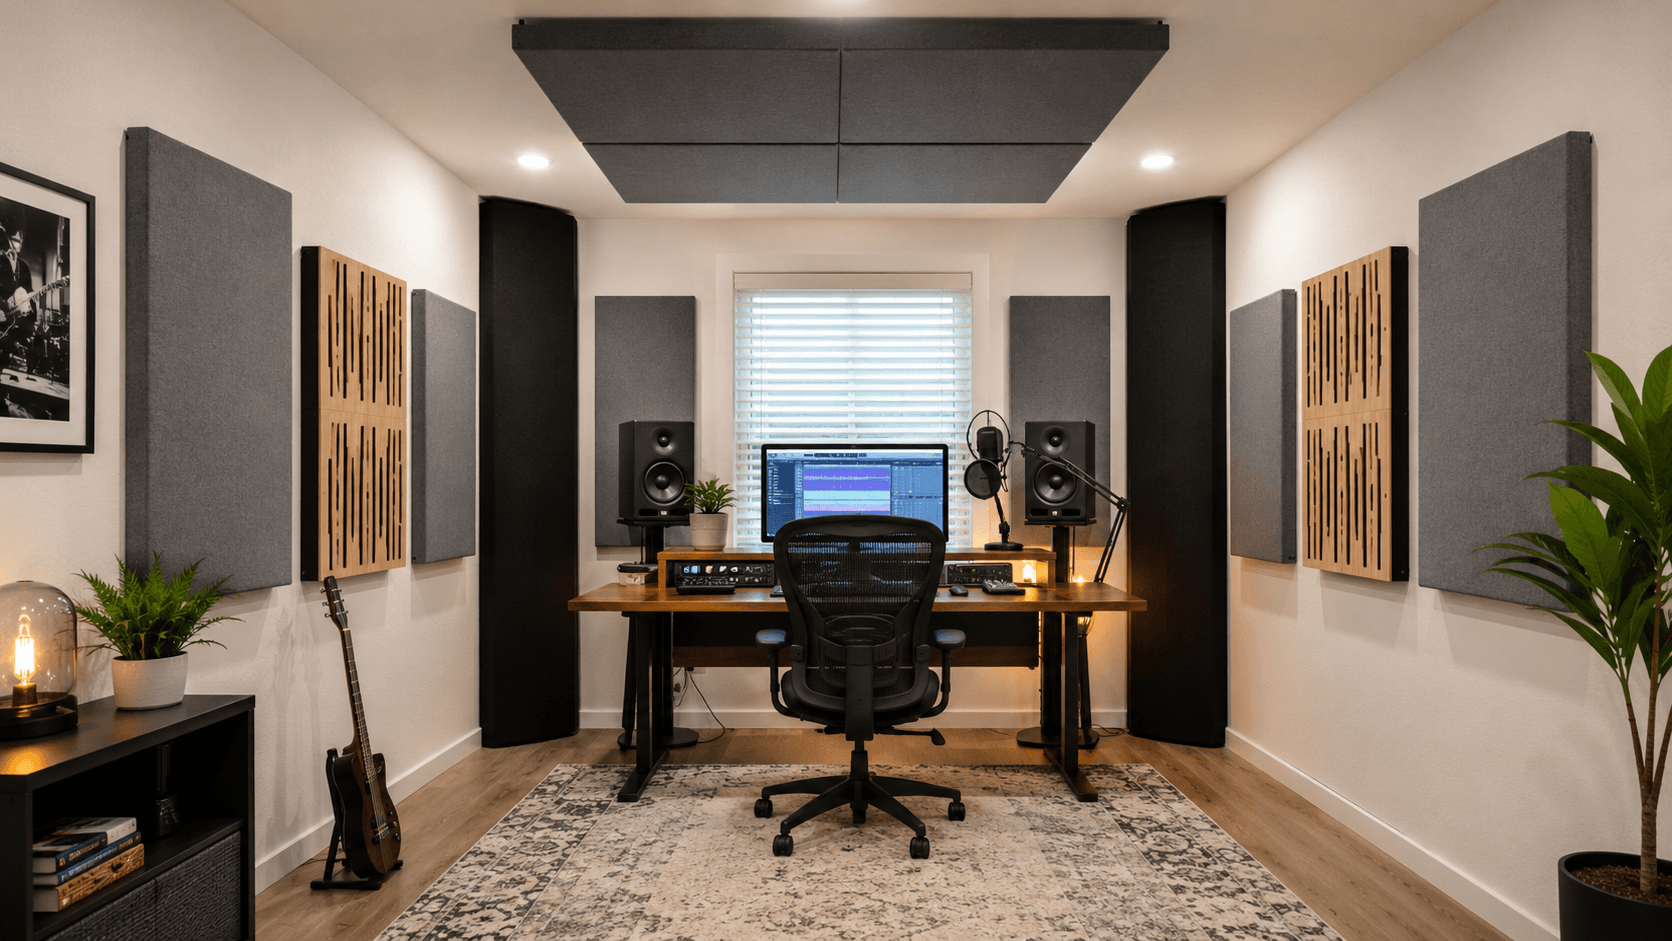
Step 1: Identify the Room’s Main Acoustic Problems
Listen carefully before installing anything. A quick diagnosis prevents you from treating the wrong surface or frequency range.
Listen for Echo, Flutter, and Unclear Speech
Clap once near the desk, microphone, or main seat. A metallic ring often indicates flutter echo between hard parallel surfaces, while a long decay suggests excessive reverberation.
Record 15 to 30 seconds of speech from your normal position. Keep the settings unchanged for comparison.
How Can You Tell Where Acoustic Panels Are Needed?
Acoustic panels usually belong at early reflection points, on large bare walls, beside or behind speakers, and near the listening or recording position. Start where sound first bounces between the source and your ears or microphone, then add treatment only after repeating the same listening or recording test.
This method keeps visual symmetry from overriding the room’s actual acoustic needs.
Step 2: Decide What the Room Is Used For
Match the plan to the room’s purpose. Podcast rooms prioritize speech clarity, while mixing rooms need controlled reflections and balanced stereo imaging.
Match Panel Placement to the Room’s Purpose
Before mounting panels, move the desk, seat, or microphone by 12 to 24 inches. A small change can reduce reflections from a nearby wall.
For example, move a home-office desk away from the rear wall, rotate the microphone, and treat two side-wall reflection points. A repeat recording will show whether ceiling treatment is still necessary.
The table below shows useful starting priorities:
| Room Type | First Priority | Secondary Priority | Main Goal |
|---|---|---|---|
| Home office | Side walls near desk | Wall behind user | Clearer calls |
| Recording room | First reflections | Rear wall and ceiling | Cleaner recordings |
| Gaming room | Side walls | Wall behind seat | Reduced echo |
| Home theater | Side reflections | Rear wall and ceiling | Clearer dialogue |
| Bedroom studio | Side walls and corners | Ceiling cloud | Balanced monitoring |
Treat the first-priority area, test again, and expand only when a clear problem remains.
Step 3: Establish the Listening or Recording Position
Set the desk, speakers, chair, or microphone before marking any walls.
Position the Desk, Speakers, or Microphone First
Avoid placing your ears directly against a wall when space allows. For stereo listening, form an approximate equilateral triangle. If the speakers are 4 feet apart, begin with your head about 4 feet from each speaker.
Keep the Left and Right Sides Symmetrical
Keep the left and right speaker distances similar. Use matching panel sizes and heights at corresponding side-wall reflection points.
Windows and shelving can create imbalance. Curtains reduce some high-frequency reflections but do not perform like broadband panels.
A stable setup makes later adjustments easier to judge.
Step 4: Find the First Reflection Points
First reflections often affect clarity and stereo imaging more than random wall coverage.
Use the Mirror Method on Side Walls
Sit in your normal position while a helper moves a mirror along one side wall. Mark where you can see each speaker, then repeat on the opposite wall.
Center a panel over the combined reflection zone. A 24-by-48-inch panel usually covers more useful area than several small foam tiles.
Should Acoustic Panels Go Behind Speakers or Behind You?
Side-wall reflection points usually come first. Panels behind speakers can reduce front-wall reflections, especially when speakers sit close to the wall. Panels behind you can control strong rear-wall returns. Your priority depends on room length, speaker distance, and which surface causes the clearest loss of definition.
Short rooms often need earlier rear-wall treatment because reflections return quickly.
Step 5: Place Panels at the Correct Height and Spacing
Panels must intersect the main sound path, not simply occupy an empty wall.
Align Panels with Ear and Speaker Height
For seated setups, panel centers often fall around 42 to 48 inches from the floor. Use that only as a reference. Measure your actual ear and tweeter height.
For standing voice work, align treatment near mouth and microphone height.
Acoustic Panel Placement Measurements
Use these figures as adjustable starting points:
| Placement Factor | Starting Point | Why It Matters |
|---|---|---|
| Panel center | Ear or microphone height | Targets main reflections |
| Air gap | About 1 to 4 inches | May extend absorption lower |
| Panel spacing | Cover reflection zones | Limits untreated gaps |
| Ceiling position | Above desk or main seat | Controls vertical reflections |
| Corner treatment | Where surfaces meet | Helps manage bass buildup |
Performance also depends on thickness, material, density, airflow resistivity, and construction. Test these starting points in your room.
Step 6: Treat the Front Wall, Rear Wall, and Ceiling
After treating side reflections, listen for echo from larger surfaces.
Add Front-Wall and Rear-Wall Treatment
Thin decorative panels mainly reduce higher-frequency reflections. Thicker broadband panels generally absorb a wider range, while diffusers scatter sound.
Small rooms often respond more predictably to absorption. Larger rooms may have enough distance for useful diffusion.
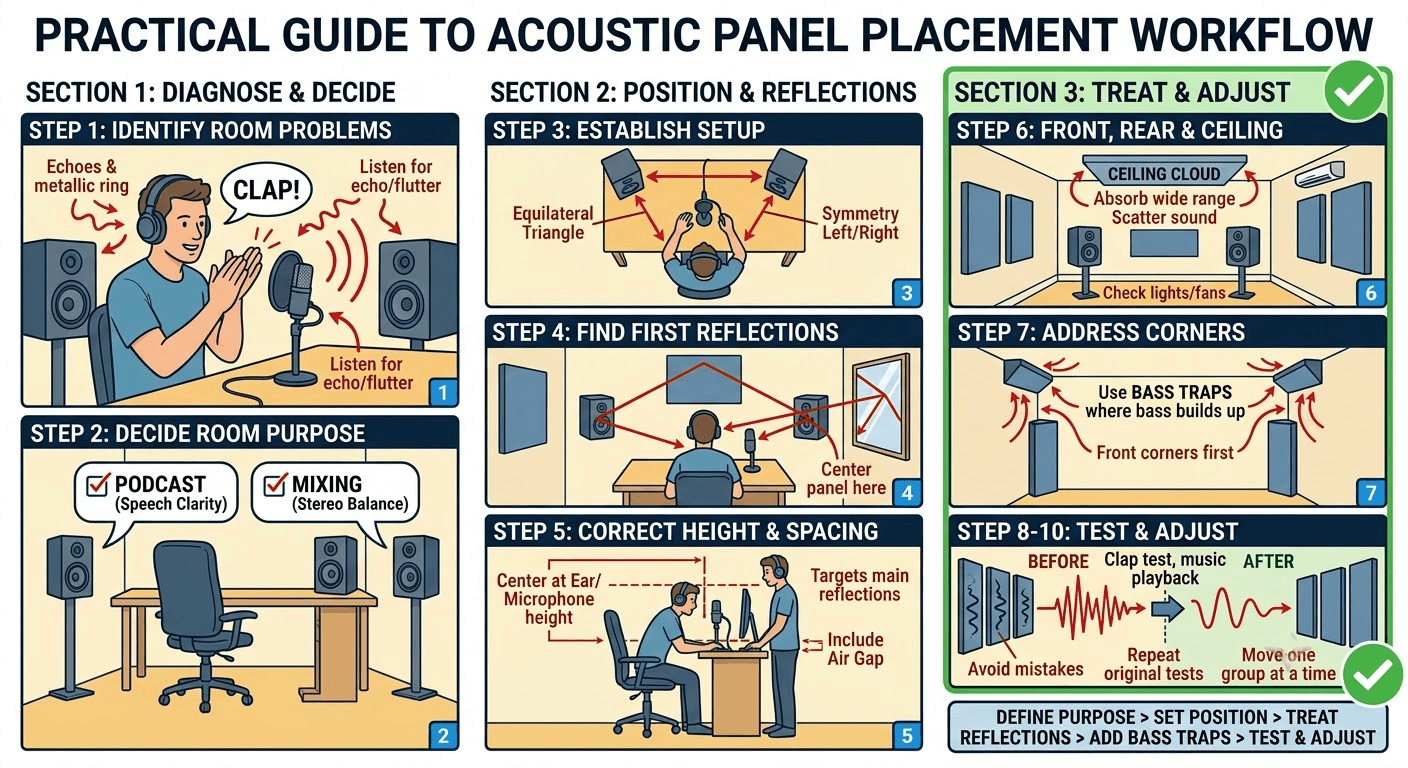
Consider a Ceiling Cloud
A ceiling cloud above the desk, microphone, or main seat controls vertical reflections. Two to four panels may cover the key area in a compact room.
Keep panels clear of lights, fans, sprinklers, and vents. Use hardware rated for overhead loads.
Step 7: Address Corners and Low-Frequency Problems
Wall panels may reduce echo while leaving bass buildup largely unchanged.
Use Bass Traps Where Bass Builds Up
Start with front vertical corners, wall-ceiling junctions, or the wall behind speakers. Thicker broadband absorbers generally extend absorption lower than thin panels of comparable construction.
Large bass changes between the desk, rear wall, and corners suggest a low-frequency problem.
Do You Need to Cover Every Corner with Bass Traps?
You do not need to treat every corner immediately. Start with the two front vertical corners, test again, and add coverage only when bass remains uneven. Doors, windows, furniture, budget, and available space will determine whether rear or ceiling-corner treatment is practical.
Staged treatment helps you spend money where it produces a noticeable result.
Step 8: Choose Suitable Acoustic Panels and Mounting Methods
Choose panels by thickness, frequency-specific performance, durability, appearance, and fire documentation.
Compare Foam, Fabric-Wrapped, and Decorative Panels
The table below compares common options:
| Panel Type | Strength | Limitation | Suitable Use |
|---|---|---|---|
| Acoustic foam | Light and easy to install | Limited bass control | Voice rooms |
| Fabric-wrapped fiberglass | Broad absorption | Heavier mounting | Studios and theaters |
| Polyester panel | Durable and decorative | Performance varies | Offices |
| Wood-slat panel | Strong visual appeal | May need absorptive backing | Living spaces |
Review data at frequencies such as 125, 250, and 500 Hz instead of relying on one headline rating. Panel density, backing, and mounting gaps also affect results.
Wellco Wholesale offers acoustic and insulation materials with flexible order quantities and fulfillment from its 90,000-square-foot California warehouse. Verify stock, shipping eligibility, dimensions, fire-test reports, and acoustic data before ordering.
Step 9: Install Panels Safely
Match the mounting method to the wall type, panel weight, air-gap requirement, and whether the installation must be removable.
Choose Temporary or Permanent Mounting
Removable strips may suit lightweight rental installations. Impaling clips, brackets, French cleats, and mechanical fasteners offer stronger support for heavier panels.
Check for wiring, plumbing, studs, and framing before drilling. Use load-rated hardware for ceiling panels.
Leave an Air Gap When Appropriate
A 1-to-4-inch gap is a practical starting range for many broadband absorbers. In one small studio, moving existing 2-inch panels about 2 inches from the wall improved low-mid control enough to delay replacement.
Results vary with panel design, wall construction, mounting depth, and problem frequencies.
Step 10: Test and Adjust the Finished Layout
Repeat your original tests with the same volume, positions, and recording settings.
Compare the Room Before and After Installation
Repeat the clap test, speech recording, and familiar music playback. Move one panel group at a time so you can identify which change helped.
Smartphone apps provide rough screening, while a calibrated measurement microphone gives more dependable frequency and decay data.
Avoid Common Acoustic Panel Placement Mistakes
Avoid placing every panel on one wall, treating only behind the desk, relying on thin foam for bass, ignoring the ceiling, or prioritizing decoration over reflection paths.
When budget is limited, treat the two side-wall reflection points first, then address the strongest rear-wall or ceiling reflection.
Conclusion
To place acoustic panels effectively:
-
Define the room’s purpose.
-
Set the listening or recording position.
-
Treat first reflection points.
-
Add front, rear, and ceiling treatment where tests show a need.
-
Use thicker corner treatment for low-frequency problems.
Your result depends on room geometry, panel construction, mounting height, air gaps, and problem frequencies. Test each change and expand only when a specific issue remains.
[Shop Wellco Wholesale’s full range with 1-piece MOQ and free shipping over $300 →]