Reflective Insulation Double Sided Foil: Buyer’s Guide
If you’re quoting materials for barns, greenhouses, metal buildings, or quick-turn retrofits, reflective insulation double sided foil often shows up on the shortlist because it’s lightweight, fast to roll out, and can noticeably cut the “radiant bake” you feel under a hot roof. The catch: this product category doesn’t behave like thick, fluffy insulation. It mainly targets radiant heat, and the results hinge on installation details—especially preserving an air space.
This article helps you decide where double-sided foil is worth it, how to spec it like a pro, and how to install it so you actually get the benefit. If you’re buying for multiple crews or repeat farm/building work, consistent SKUs and roll formats matter; Wellco Wholesale positions itself as a factory-direct, one-stop wholesaler across agricultural, gardening, landscaping, and light building supplies—useful when you’re standardizing materials across sites.
How Reflective Insulation Double Sided Foil Works
Heat moves three main ways:
-
Radiation: heat “beaming” from a hot surface (roof metal, sunlit wall)
-
Conduction: heat moving through solids (framing, sheathing)
-
Convection: heat carried by moving air (leaks, unsealed cavities)
Double-sided foil works by offering a low-emissivity (low-e) surface facing an air space, reducing radiant transfer across that gap. Without the air space, the foil can act more like a conductor than a shield.
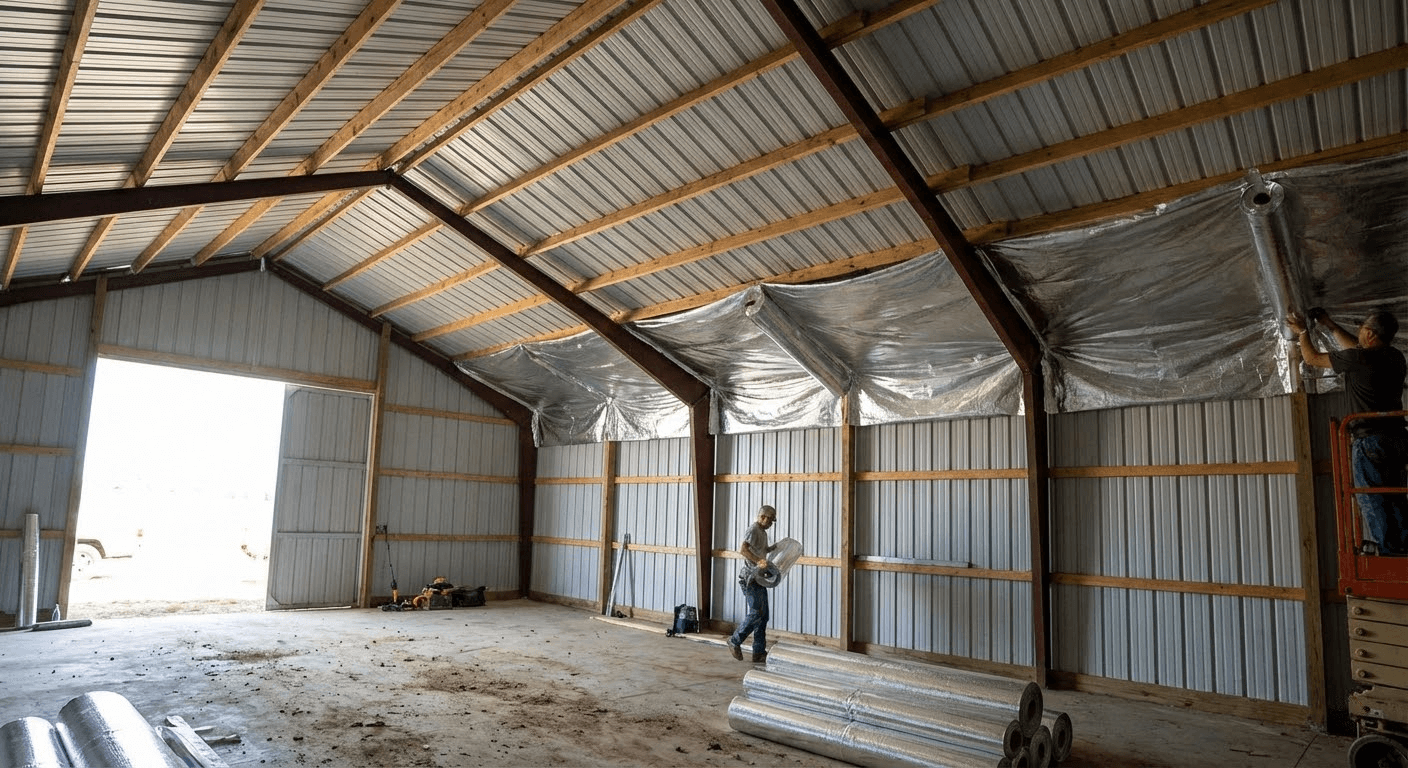
A practical rule you can build a crew checklist around: when installing a foil-type radiant barrier, let it droop between attachment points to create about a 1 inch (2.5 cm) air space. That guidance is explicitly called out by the U.S. Department of Energy for foil-type installations.
Specs that matter most (and what to ignore)
-
Emissivity / low-e surface: lower emissivity = better radiant control (the “shiny” side works because it emits/absorbs less radiant heat).
-
Air space quality: a perfect foil product installed flat against sheathing usually underperforms a “good enough” product installed with a clean, continuous air gap.
-
R-value claims: reflective systems can have labeled R-values that depend on heat-flow direction and assembly details—don’t compare them like you would batts or foam. The Insulation Contractors Association of America notes reflective insulation R-values depend on direction and should be part of label information.
Key Benefits for Trade, Farm, and Light-Building Jobs
Energy and comfort gains (when installed correctly)
Where you typically see the best payoff:
-
Metal barns, equipment sheds, workshops
-
Attics or ceiling cavities below sun-exposed roofs
-
Hot-air plenums or duct runs in attic-like spaces
Savings are real but variable by climate, baseline insulation, duct location, and workmanship. A Florida Solar Energy Center field study of radiant barrier retrofits reported average cooling energy savings of about 9% across monitored sites.
Field summaries in hot/humid regions often cite cooling savings ranging from under 5% up to about 25%, with many experts considering 5–15% a realistic planning range for typical cases.
Moisture, condensation, and corrosion reduction
In metal-roof ag buildings, condensation can be as damaging as heat—drips onto feed, tools, packaging, plants, and equipment. Double-sided foil can help when it’s part of a whole assembly:
-
Radiant control that reduces extreme surface temperature swings
-
Ventilation that removes moisture-laden air
-
Good detailing that avoids trapping moisture
First-hand job vignette (Experience): On a small metal-roof equipment shed retrofit (anonymized), the “drip line” under morning warm-ups persisted after the first install because the crew pulled the foil tight and left seams unsealed. Re-hanging it with a consistent air space and taping seams reduced visible dripping during similar weather swings. The lesson wasn’t the brand—it was the air gap + continuity.
Durability and handling on job sites
Not all rolls are built the same. Reinforcement matters if you expect abrasion, tight framing bays, or frequent contact during maintenance. Also confirm exposure limits: some foil products aren’t intended for prolonged UV exposure unless specifically rated for it.
Choosing the Right Reflective Insulation Double Sided Foil
Spec checklist buyers should compare
When you’re purchasing for professional use, ask for specs you can verify:
-
Emittance/emissivity values (low-e surface performance)
-
Product construction: bubble/foam/woven/multi-layer + reinforcement
-
Thickness and roll format: affects durability and install speed
-
Fire performance documentation: critical in many interiors
-
Testing and standards alignment: request the test reports, not just marketing text
If you want a recognized baseline for what “sheet radiant barrier” means, ASTM’s C1313/C1313M specification covers physical property requirements for sheet radiant barriers used in building construction, including the concept of low far-infrared emittance.
Match product to application (quick logic)
-
Under metal roofing (barns/sheds): prioritize reinforcement + an install plan that preserves an air space.
-
Interior walls/ceilings: prioritize code/fire documentation + seam strategy to control air movement.
-
Greenhouses/hoop houses: prioritize condensation awareness, cleanability, and avoiding moisture traps.
Installation Best Practices That Make or Break Performance
Prep and materials
Bring what makes continuity easy:
-
Appropriate fasteners for the substrate
-
Foil-compatible tape for seams/penetrations
-
Spacers/furring strips where needed to maintain air space
-
PPE for overhead work and sharp edges
Remember the principle: radiant barriers reduce radiant heat flow across an adjacent air space—that adjacent air space is part of the “system,” not optional.
Step-by-step install (three common scenarios)
1) Under metal roofing purlins
-
Plan attachment so the foil can droop and keep an air space (avoid drum-tight pulls).
-
Fasten consistently; don’t crush it into contact with roof metal or sheathing.
-
Overlap and tape seams to reduce bypass.
-
Detail penetrations like a control layer—tight, taped, and durable.
2) Interior wall/ceiling retrofit
-
Identify which foil face will “see” the air space.
-
If the assembly would pinch the foil tight, add furring/spacers.
-
Tape seams and edges to limit convective looping behind the foil.
3) Greenhouse or hoop-house lining
-
Treat humidity as the main design input: don’t create a moisture sandwich.
-
Secure edges to prevent flapping and tearing.
-
Keep ventilation and drainage pathways intact.
Common mistakes (and quick fixes)
-
No air gap: add furring/spacers or re-hang with slack to create space.
-
Leaky seams: tape and detail penetrations; continuity matters.
-
Compression behind cladding: rework attachment points to preserve spacing.
-
Ignoring dust/contamination: plan placement to reduce dust buildup on reflective surfaces (performance drops when the “shiny” side is dirty).
Cost, ROI, and Buying in Bulk
Pricing typically tracks with:
-
Reinforcement and build quality
-
Documentation/certifications (especially fire performance)
-
Roll size and thickness
-
Specialty adhesives/facings
ROI should be framed honestly: cooling savings vary widely with climate, attic/duct configuration, and workmanship. Field data supports meaningful savings in many hot-climate cases, but “one number” rarely fits every site.
Bulk procurement tips for trade buyers:
-
Standardize 1–2 SKUs matched to your most common use-cases
-
Add a waste factor for overlaps, cuts, and penetrations
-
Store rolls clean/dry so tapes and facings perform as intended
If you’re purchasing across categories (ag + garden + light-building), consolidating orders through a wholesaler such as Wellco Wholesale can reduce POs and help keep roll formats consistent across crews—especially when you’re trying to avoid last-minute substitutions that change install behavior.
Conclusion
Reflective insulation double sided foil is at its best when the problem is radiant load from hot surfaces—especially metal roofs and sun-exposed cavities—and when you install it with the air space and seam continuity it needs to function. Use it to address radiation, then use bulk insulation and air sealing where conduction and convection dominate.
A solid next step is simple: measure the space, pick the application (roof/wall/greenhouse), choose specs you can verify (including standards-based documentation), and plan an installation that preserves an air gap from day one.
Frequently Asked Questions
Does double-sided foil need an air gap on both sides?
You need an air space next to the reflective surface to get meaningful radiant control. In many assemblies, only one side will “see” the key air cavity; follow the manufacturer guidance and prioritize the side facing the hot surface.
Is this a replacement for fiberglass batts or foam board?
Not usually. Foil systems primarily address radiation; batts/foam address conduction. Many of the best-performing builds use foil for radiant control plus bulk insulation for overall thermal resistance.
How can I verify performance claims before buying a pallet?
Ask for documented test results and standards alignment (for sheet radiant barriers, ASTM C1313/C1313M is a common reference point). Also confirm how any stated R-values are labeled for direction/assembly conditions.
What’s the biggest installer mistake you see?
Installing it tight with no air space. Foil needs that adjacent air gap to reduce radiant transfer; without it, you often get disappointing results.
Is it safe to use in all interior applications?
Not automatically. Confirm fire performance documentation and check local code requirements for the specific location (attic, wall cavity, exposed interior surface), then install to manufacturer instructions.