How to Apply Acoustic Foam Panels: Step-by-Step Guide
If your room sounds “echoey,” your voice feels sharp on calls, or recordings have that hollow bedroom bounce, acoustic foam panels can improve clarity quickly. They reduce reflections and flutter echo, which makes speech easier to understand and mic recordings less “roomy.” You will still hear traffic outside your window because foam is not designed for isolation, yet you can absolutely make a small space sound more controlled with smart placement.
I like to start every install the same way: record a 20 second voice clip on your phone and do a quick clap test in your usual speaking spot. After installation, repeat the same tests in the same position. That simple before and after check keeps you honest about what changed and helps you avoid overbuying.
If you’re outfitting multiple rooms or buying for a team, consistency becomes part of the “sound quality.” Bulk buyers usually care about uniform thickness, predictable packaging, and repeatable layouts so every booth or office sounds similar. Wellco Wholesale positions itself as a factory direct wholesaler serving trade customers who buy in volume, which can fit projects where you want the same panel spec across multiple spaces and occasional replenishment without switching suppliers.
Understand Acoustic Foam Panels Before You Install
What acoustic foam actually improves
Acoustic foam mainly tackles reflections inside the room. That means it helps with:
-
Flutter echo, the “ping ping” after a clap
-
Harshness on voice and cymbals
-
Reverb that makes speech muddy on calls or streams
It does not soundproof. If your goal is keeping sound from leaving or entering the room, you need to address gaps, doors, and mass.
Quote to keep expectations realistic: many foam manufacturers describe foam as a tool for controlling echo and reflections in a space rather than stopping sound transmission through walls.
Panel types and how to choose (density, thickness, shape)
The pattern, wedge, pyramid, egg crate, mostly changes surface shape and aesthetics. Thickness and coverage are the big levers.
Practical selection guidance that works in typical bedrooms and offices:
-
1 to 2 inch foam often helps with higher frequency reflections and slap echo.
-
2 to 4 inch foam can be more effective overall and can reach somewhat lower frequencies compared with thin foam, though it still isn’t a replacement for true bass traps.
Experience tip from real installs: I’ve seen more improvement from placing fewer panels in the right spots than from covering a random wall with a cool looking pattern. If you have a limited budget, prioritize thickness and placement over shape.
Safety and material considerations
Before you mount anything, check for:
-
Fire rating documentation if you’re in a commercial setting or need code compliance.
-
Odor and ventilation. Let foam air out if it smells after unboxing.
-
Heat and moisture. Keep foam away from heaters, hot lights, and damp walls.
A common manufacturer instruction across adhesives and foam products is to install on clean, dry surfaces and avoid high humidity during curing. Treat that as a rule, not a suggestion.
Plan the Layout: Where Panels Matter Most
Do a quick room test (no special gear)
Do these two tests now and save the “before” results.
-
Clap test: stand where you speak or record and clap once. If you hear a fast metallic ringing, you have flutter echo.
-
Phone recording: say the same sentence twice at the same distance. Save the clip.
Statistic style check you can trust: even a small reduction in early reflections can noticeably improve speech intelligibility for listeners. You don’t need full wall coverage to hear a difference.
Identify high impact placement zones
If you want the best improvement per panel, treat these zones first:
-
First reflection points on the side walls near your listening or speaking position
-
The wall behind your microphone, or behind your head if you speak toward a desk
-
A small ceiling zone above the mic or desk in low ceiling rooms
Foam in corners can reduce some high frequency reflections, yet low frequency boom is typically a different problem. If bass is your pain point, plan for thicker corner treatment or other materials designed for bass.
How many panels do you need
A simple starter plan for a small room:
-
Voice calls, streaming, podcasts: start with 6 to 10 panels placed behind the mic and at key side reflections.
-
Light music and general listening: expand to 10 to 20 panels, adding a ceiling zone and back wall treatment.
Quote style guidance you’ll see from installers: treat the first reflection points first, then fill in the back wall, then address the ceiling if needed.
Mini experience story: In a spare bedroom setup I helped with, we started with eight 2 inch panels around the desk zone and behind the mic. The clap test went from a sharp “zing” to a short, dull “thud,” and the phone clip sounded less boxy without touching the mic settings. We only added four more panels after that to calm the back wall reflections.
Prep the Surface and Gather Tools
Tools and supplies checklist
-
Measuring tape
-
Painter’s tape
-
Level or phone level app
-
Microfiber cloth
-
Mild cleaner for washable walls
-
Your mounting method: removable strips, adhesive squares, spray adhesive, or backer boards
Statistic like practical detail: most adhesion failures come from dust, textured paint, or not pressing long enough, so surface prep is where your success rate jumps.
Surface prep steps for best adhesion
-
Dust the wall thoroughly with a microfiber cloth.
-
If it’s smooth and washable, lightly clean and let it dry fully.
-
Avoid fresh paint. Many paint manufacturers recommend allowing paint to cure fully before applying adhesives, which can take days or longer depending on paint type and conditions.
If your wall is heavily textured, foam often won’t get enough contact surface for strips to hold reliably. Backer boards or mechanical mounting are usually the clean solution.
Safety and wall protection (patch test first)
Before committing to a full wall:
-
Patch test one panel in an inconspicuous spot for 24 hours.
-
After it cures, remove it the way the adhesive instructions describe.
-
Check for paint lift or residue.
For spray adhesive, ventilation matters. Open windows, use masking, and keep away from ignition sources. This is a trust issue as much as a comfort issue.
How to Apply Acoustic Foam Panels: Step by Step
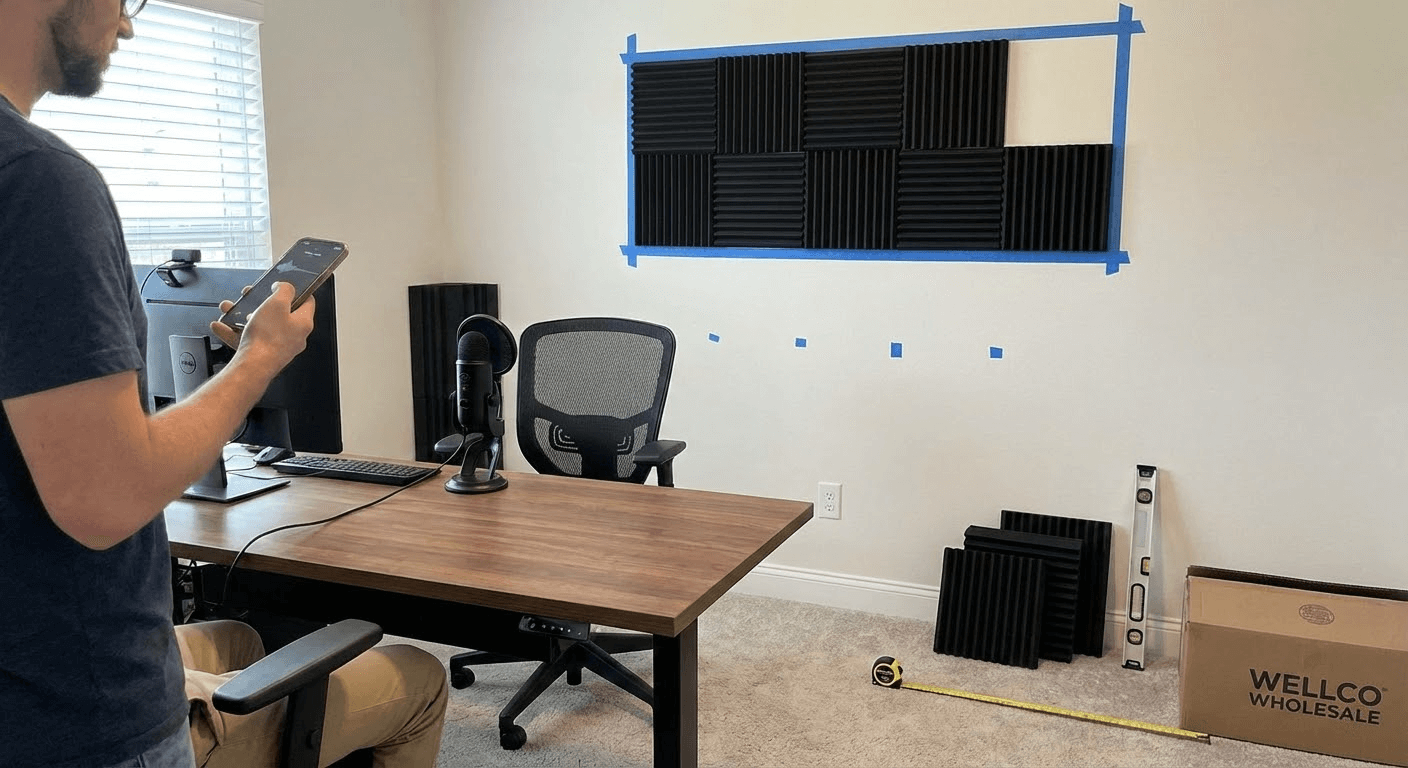
Mark the layout
-
Decide your zones first: behind mic, side reflections, ceiling spot if needed.
-
Use painter’s tape to outline the grid or panel boundaries.
-
Mark a centerline or a reference corner so your rows don’t drift.
-
Dry fit a row on the floor to confirm spacing.
Quote from experienced installers: measure twice, stick once. Alignment gets harder to correct after adhesive touches the wall.
Mounting method A: Removable strips or adhesive squares
Best for rentals and anyone who wants flexibility.
-
Apply strips to the foam first, corners plus one in the center for larger panels.
-
Press strips onto the foam firmly.
-
Align with your tape marks.
-
Press the panel evenly against the wall for 30 to 60 seconds.
Practical spec style note: many removable strip products require a set press time and a cure period before you load or tug them. Follow that label guidance closely because it’s the most common reason panels fall.
Mounting method B: Spray adhesive (strong hold, harder to remove)
Good for permanent installs.
-
Mask the area and ventilate the room.
-
Apply a light, even coat to the foam and the wall.
-
Wait until tacky.
-
Place carefully. Repositioning is difficult once contact happens.
-
Press flat for consistent bond.
Experience note: use a light coat and patience. Heavy spraying tends to bleed through some foam and makes a mess without improving bond strength.
Mounting method C: Backer boards for clean installs
This is my favorite method for textured walls, offices, and multi room rollouts.
-
Attach foam to thin boards using adhesive squares or spray adhesive.
-
Hang the boards like frames using hooks, rails, or picture hangers.
-
Move the boards later if you change the room layout.
Trade friendly advantage: boards let you standardize a “panel module” so every room gets the same treatment pattern with faster installation.
Finish checks
-
Press edges and corners again after 10 to 15 minutes.
-
Leave everything alone for the full cure time on the adhesive label.
-
Repeat the clap and phone tests in the same location.
Target outcome: the “ping” after a clap should shorten and soften, and your voice clip should sound less reflective without changing EQ.
Common Mistakes and How to Fix Them
Expecting soundproofing
If you still hear outside noise, that’s normal. Start isolation improvements with gaps and doors: weatherstripping, door sweeps, sealing obvious leaks. Foam panels solve a different problem.
Too few panels or wrong locations
If the room still rings:
-
Move panels to first reflection points.
-
Add panels behind your mic or behind you.
-
Add a ceiling spot if reflections are coming from above.
Panels falling off
Here’s a quick troubleshooting table.
| Problem | Likely Cause | Fix |
|---|---|---|
| Panel drops overnight | Dusty wall or weak contact | Clean again, add more adhesive points, press longer |
| Corners peeling | Not enough adhesive at edges | Add corner strips or use backer boards |
| Falls on textured wall | Low contact surface | Use backer boards or mechanical mounting |
| Adhesive damages paint | Paint not cured or wrong adhesive | Patch test first, use removable methods, switch to boards |
Over treating a small room
If the room feels uncomfortably “dead,” reduce coverage or keep untreated areas to maintain some natural liveliness. Soft furnishings can balance reflections without killing the room.
Buying Tips for Consistent Results (Bulk and Trade Friendly)
What to verify before purchasing
If you’re buying for multiple rooms or ordering in volume, confirm:
-
Thickness and size tolerance
-
Material specs and density if provided
-
Fire rating documentation where required
-
Packaging method, especially if panels ship compressed
-
Batch consistency so rooms match
A procurement style quote many installers live by: consistency beats perfection. A uniform panel spec across rooms is often better than mixing random foam types.
Packaging, shipping, and storage
Foam panels are often shipped compressed. Let them expand and settle before mounting. Store flat, dry, and away from heat and sun.
Practical statistic style note: the first 24 to 48 hours after unpacking is when many compressed foams regain shape, which affects how clean your grid looks.
Supplier note
For trade customers doing repeat installs, a wholesaler who can maintain the same specs across reorders helps standardize results. Wellco Wholesale describes itself as a professional wholesale supplier across multiple product categories, aimed at bulk and trade buyers. In a multi room project, that positioning can matter when you need steady availability and consistent ordering processes.
Conclusion
Acoustic foam panels work best when you treat reflection hotspots, prep the wall properly, and choose a mounting method that matches your surface and your lease. Do a quick clap test and a phone recording before you start, install a starter layout in the highest impact zones, let adhesives cure fully, then retest and expand only where you still hear reflections.
If you want a clean next step, start with panels behind your mic and the first reflection points, then scale to the ceiling and back wall after you confirm the difference.
Frequently Asked Questions
Do acoustic foam panels soundproof a room?
They reduce echo and reflections inside the room, which improves clarity. They won’t block sound traveling through walls. If isolation is the goal, focus on sealing gaps and adding mass.
How do I know where to place panels first?
Start with first reflection points near where you speak or listen, plus the wall behind your microphone. A quick clap test and a before and after phone recording will guide you better than guessing.
What’s the safest way to mount panels in a rental?
Use removable strips or mount panels to backer boards and hang the boards like frames. Always patch test one panel for 24 hours to make sure your paint tolerates the adhesive.
Why do my panels keep falling off?
It’s usually dust, texture, humidity, or not pressing long enough. Clean the surface thoroughly, add more adhesive contact points, and switch to backer boards for heavily textured walls.
How many panels should I buy to start?
For voice and streaming, starting with 6 to 10 panels in key zones is often enough to hear a difference. Retest after installing and add panels only where reflections remain.