How to Cut Acoustic Panel: Tools, Steps, And Safety
A clean-looking acoustic panel job usually comes down to one unglamorous skill: cutting. When edges fray, seams wander, or outlet cutouts land a hair off, even premium panels can look “DIY.” This guide shows how to cut acoustic panel materials cleanly and safely—whether you’re trimming a few panels for a home studio or sizing dozens for a commercial space.
At Wellco Wholesale, we support both trade customers buying in bulk and individual retail buyers sourcing project materials, so we’ve seen the same issues repeat: dull blades, rushing measurements, and using the wrong method for the panel type.
Who / How / Why (Transparency)
-
Who this is for: DIY installers, contractors, facilities teams, and bulk buyers who want consistent, professional cuts.
-
How the methods were chosen: Cross-checked against multiple manufacturer installation guides for PET felt and acoustic wall panels, plus safety guidance for fibrous materials.
-
Why it matters: Cleaner cuts = tighter seams, fewer reorders, and fewer performance-compromising gaps.
Choose the Right Acoustic Panel Type Before Cutting
Before you decide on tools, identify what you’re cutting—core and face.
Fiberglass/mineral wool vs. polyester vs. foam vs. wood-slat panels
-
PET felt (polyester): Dense and cuttable with sharp blades. Many manufacturers recommend a sharp knife + straightedge, cutting in multiple passes along the same line.
-
Fiberglass/mineral wool: Cuts well with serrated knives but can release irritating dust/fibers—plan PPE and cleanup.
-
Foam: Easy to cut, easy to tear or compress—light pressure and long blades help.
-
Wood-slat panels (slats over felt/backing): Treat like finish carpentry—support the panel, pick the right saw blade, and control chip-out.
Check specs that change your cut plan
Look for:
-
Thickness (thin tiles vs. thick panels)
-
Facing (fabric wrap/film) that can fray if you “one-pass” it
-
Rigid backing that may need a saw or oscillating tool
-
Install method (dry-fit and align before adhesive is common best practice)
Tools You’ll Need to Cut Acoustic Panels Cleanly
Best tools by material
For PET felt and many fabric-faced panels
-
Utility knife or precision knife + plenty of fresh blades
-
Metal straightedge / ruler (clampable)
For fiberglass/mineral wool
-
Serrated insulation knife (long strokes)
For wood-slat acoustic panels
-
Circular saw or multitool saw (straight cuts), jigsaw (notches), oscillating tool (cutouts)
Setup for accuracy
-
Flat sacrificial surface (plywood/rigid foam)
-
Clamps to lock the straightedge
-
Tape measure + square
-
Painter’s tape (helps reduce fabric snagging and improves line visibility)
How to Cut Acoustic Panel: Step-by-Step Methods
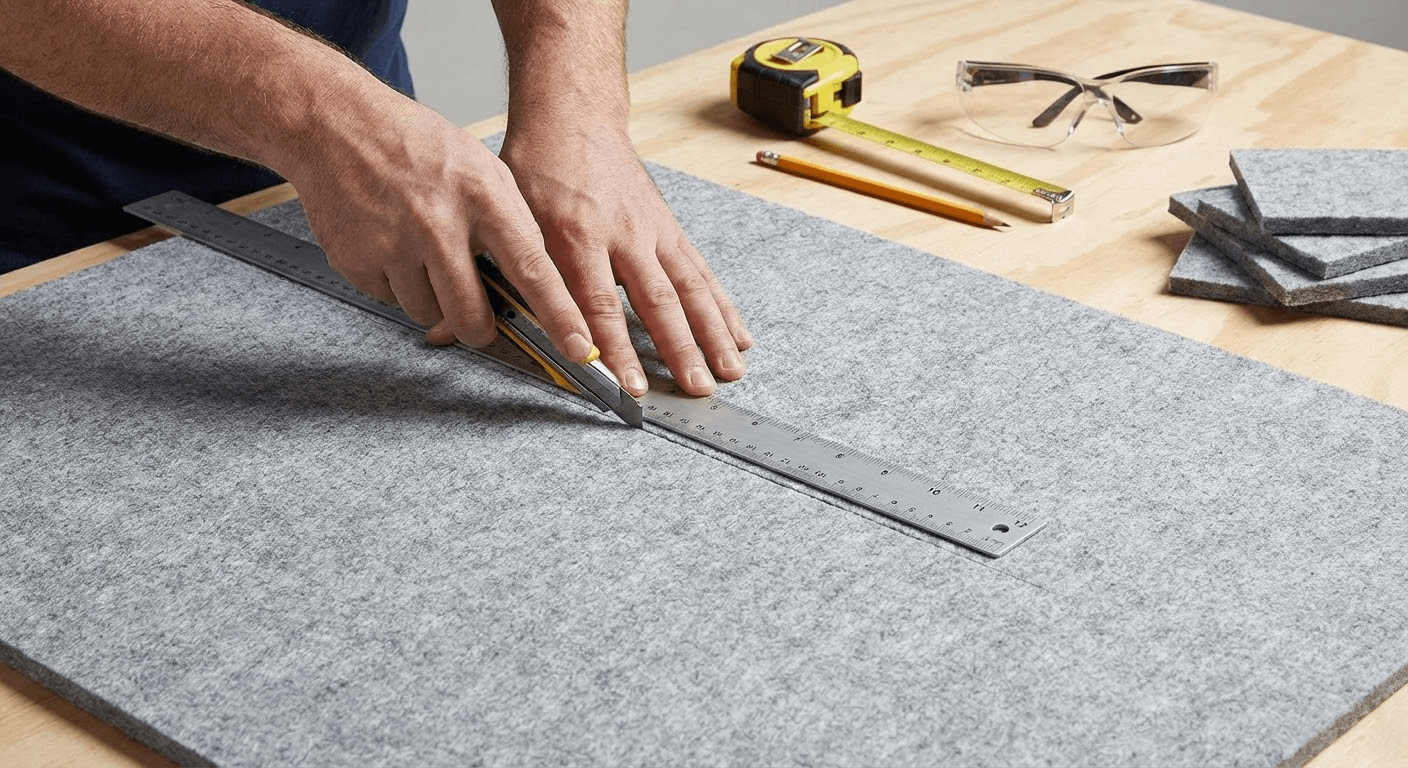
Method 1: Straight cuts with a knife (most PET felt / fabric-faced panels)
Manufacturers commonly recommend a sharp knife + ruler and cutting step by step in multiple passes along the same path for cleaner results.
-
Dry fit first and confirm your layout lines are level/plumb.
-
Mark from the back when possible (reduces visible face scuffs).
-
Tape the cut line (especially on fabric faces).
-
Clamp your straightedge just outside the line.
-
Score lightly on pass #1, then repeat 2–5 passes until through.
-
Finish from the back if the last fibers resist.
Experience note (what changed my results): The first time I cut fabric-faced panels, I tried to “power through” in one deep cut—edges frayed and seams looked fuzzy. Switching to painter’s tape + multiple light passes made the edge look crisp enough that seams nearly disappeared under normal room lighting.
Method 2: Cutting thick fiberglass/mineral wool panels
-
Put down a disposable drop cloth or cardboard.
-
Wear PPE (see Safety Considerations below).
-
Use a serrated insulation knife and cut with long, steady strokes.
-
Vacuum cleanup—avoid sweeping, which can re-aerosolize fibers.
Method 3: Panels with rigid backing or wood slats
-
Support the full panel to prevent vibration.
-
For slats, use a saw suitable for clean finish cuts; many install guides list circular or multitool saws as typical tools.
-
If there’s a backing board, consider separating the operation:
-
Knife cut the felt/backing layer where appropriate
-
Saw the slats/backer with the right blade and support to limit chip-out
-
-
For notches and tight cutouts, an oscillating tool gives control near edges.
Anonymized jobsite example: A retrofit needed slat panels around a column plus two outlet cutouts. The “all-knife” attempt tore the felt and chipped a slat corner. Re-doing it with a straight saw cut for the slats, then finishing the notch with an oscillating tool, fixed the reveal lines and prevented a reorder.
Safety Considerations (read before you cut)
-
Fiberglass/mineral wool: NIOSH guidance for fibrous glass dust includes respirators equipped with N95/R95/P95 filters for certain exposure levels.
-
Respirator fit matters: NIOSH notes filtration/approval basics and emphasizes correct wearing for effectiveness.
-
Wood/MDF components: Wear eye protection; use dust extraction if available.
Clean Edges, Prevent Fraying, and Hide Seams
Edge finishing techniques
-
Fabric faces: Tape-first cutting reduces fray; if needed, re-wrap and secure loose fabric with appropriate adhesive.
-
PET felt edges: Multiple light passes usually beat sanding (sanding can “fuzz” edges).
-
Slat faces: Plan cuts so the most visible edge lands in a corner, behind trim, or under a shadow gap.
Seam planning for pro-looking installs
-
Start from a centerline so the last piece isn’t a thin sliver.
-
Keep orientation consistent (felt texture and slat direction can make seams stand out).
-
Rule-of-thumb estimate: For simple rectangular rooms, many installers order extra material for offcuts; obstacle-heavy layouts (columns/outlets) need more. Treat 10–15% extra as a planning estimate—not a universal rule.
Cutouts for Outlets, Switches, Corners, and Fixtures
Safe, accurate cutouts
-
Template first: Trace the cover plate or box outline on paper/card.
-
Transfer marks to the panel (backside if possible).
-
Use an oscillating tool for plunge cuts and corners.
-
Dry fit before final mounting—dry fitting is a common manufacturer recommendation prior to adhesive installs.
Troubleshooting table (fast fixes)
-
Cut line drifted: Re-square your straightedge and do lighter passes.
-
Fabric frayed: Tape the next cut; switch to a new blade; reduce pressure.
-
Cutout slightly oversized: Hide with a larger cover plate or reposition seams so the plate lands over the joint.
-
Panel won’t sit flat near a cutout: Add support points or adjust adhesive coverage.
Buying Tips for Pros and Bulk Projects
-
Batch consistency: Keep lots together for color/texture matching.
-
Pre-plan the cut map: Sketch the wall with seams, outlets, and corners before ordering.
-
Supplier reliability matters at scale: Wellco Wholesale’s factory-direct, one-stop wholesale approach helps trade customers consolidate purchasing for agricultural, gardening, landscaping, and light building supplies—useful when you’re coordinating multiple site needs (fasteners, adhesives, accessories) alongside panels.
Conclusion
The cleanest results come from matching the method to the material: knife + straightedge + multiple passes for PET felt and many fabric-faced panels, serrated blades and strict dust control for fibrous cores, and saw-based cuts (with solid support) for slat systems. Dry fit, mark carefully, and treat sharp blades as a consumable—your seams will look tighter and your install will move faster.
CTA: Before you mount anything, do one “test cut” on an offcut using the method above—then commit to the same tool, blade freshness, and measuring routine for the whole wall.
Frequently Asked Questions
How do I cut PET felt panels without fuzzy edges?
Use a sharp utility/precision knife, clamp a straightedge, and cut in multiple light passes on the same line rather than one deep cut. Taping the face along the cut line helps reduce snagging and keeps the edge crisp.
Can I cut acoustic panels with a circular saw?
Yes for wood-slat systems or panels with rigid components—support the panel fully and use a blade suited for clean finish cuts. For pure felt or fabric-faced panels, a knife and straightedge usually produce cleaner edges with less tear-out.
What’s the safest way to cut fiberglass/mineral wool acoustic panels?
Cut in a ventilated area, wear eye protection and a suitable particulate respirator, and vacuum cleanup rather than sweeping. NIOSH guidance for fibrous glass dust includes respirators with N95/R95/P95 filters for certain exposure levels.
How much extra material should I order for cuts and mistakes?
A common planning approach is ordering extra to cover offcuts, with more extra needed when you have many outlets, corners, or columns. Treat 10–15% as a starting estimate and adjust based on how complex your layout is.