Insulation with Reflective Foil: How It Works & When
Shiny foil can feel like a shortcut: staple it up, trap “heat,” and you’re done. In real builds, insulation with reflective foil works best when you treat it as a radiant-control system, not a standalone replacement for the insulation that handles conduction and air leaks.
Who this is for: trade pros, facility teams, farm/outbuilding owners, and bulk buyers who need reliable, repeatable installs across garages, sheds, attics, and metal buildings.
How this guide was built: practical jobsite patterns + building-science references.
Why it matters: the right configuration can cut peak heat gain and help with condensation; the wrong configuration can do almost nothing.
If you’re coordinating multi-structure jobs, it also helps to standardize the “supporting cast” (tapes, cap fasteners, furring strips, sealants). One-stop wholesalers like Wellco Wholesale can simplify that by letting crews source compatible sealing/fastening items alongside light building supplies in bulk, which reduces failures caused by mismatched accessories.
How insulation with reflective foil actually works
Radiant heat vs. conduction vs. convection
Heat moves through buildings by:
-
Radiation (infrared energy): sun-baked roof decks radiate heat to attic surfaces.
-
Conduction (through solids): studs, sheathing, metal panels.
-
Convection (moving air): warm attic air circulating, air leaks driving drafts.
Reflective foil is designed to reduce radiant transfer. It doesn’t stop heat conduction through framing, and it doesn’t fix air leakage. That’s why it can be a strong add-on in roof/attic and metal-roof scenarios—yet underwhelming in walls where conduction and air leakage dominate.
The air-gap requirement and why it matters
A reflective surface needs to “see” an air space to block radiant transfer effectively. If foil is pressed tight to plywood or crushed under framing, you’ve largely removed the mechanism you paid for.
The U.S. Department of Energy’s radiant barrier guidance emphasizes that performance depends heavily on correct placement and configuration (typically facing an air space).
Jobsite anecdote (what changed, and why it mattered):
On a small metal-roof workshop retrofit, the first attempt stapled foil flat to framing with no maintained gap. The space still spiked hot mid-afternoon. The redo used 3/4" furring strips to preserve a consistent air channel, kept the reflective face toward the open space, and taped seams. The noticeable change wasn’t “miracle insulation”—it was that the foil finally had an air cavity to reflect across, and the assembly stopped leaking hot air through seams.
What “R-value” means for reflective products
Bulk insulation (fiberglass, cellulose, foam) primarily slows conduction, so R-value is straightforward. Reflective foil’s real-world benefit often depends on:
-
air space geometry,
-
direction of heat flow,
-
how well seams and edges are sealed.
Treat big performance claims with healthy skepticism unless the spec sheet clearly states the assumed air-gap and installation setup.
Technical sidebar: low-e surfaces in plain language
Reflective foil works because it has low emissivity (often described as “low-e”), meaning it emits and absorbs less radiant energy than typical building surfaces. Lower emissivity generally means better radiant reflection performance in the right assembly. (If a product doesn’t provide emissivity or testing context, that’s a buying red flag.)
Where insulation with reflective foil makes the most sense
Attics, roofs, and hot-climate radiant barriers
Attics are the classic “good fit” because the roof deck can radiate intense heat into the attic cavity. DOE notes studies showing radiant barriers can reduce cooling costs by about 5% to 10% in warm, sunny climates.
If you want a real-world data anchor, Florida Solar Energy Center field research reported average cooling energy savings around 9% in a radiant barrier retrofit study across multiple sites (reported as an average daily kWh reduction and roughly 9%).
When it’s most likely to be worth it:
-
cooling-dominated climates,
-
dark roofs or high solar exposure,
-
attics with ducts (reducing attic heat helps duct losses).
Metal buildings, sheds, and agricultural structures
Metal buildings often combine two headaches:
-
high solar heat gain, and
-
condensation when humid air meets cool metal.
A foil layer can help reduce radiant heat transfer and—when seams are sealed—act as part of an air/vapor management approach. The key is finishing the system: taped seams, controlled transitions, and ventilation that matches the building’s moisture load.
Field pattern that repeats: condensation rarely improves just because “foil is present.” It improves when (a) seams stop leaking moist air into cold surfaces and (b) ventilation paths aren’t blocked.
Garages, workshops, and HVAC ducts
Reflective foil is often useful for:
-
duct wrap and duct-adjacent radiant reduction,
-
comfort upgrades under hot roofs,
-
garage doors and workshops where sun load is the main driver.
But if you’re trying to make a garage comfortable year-round, foil is usually a supporting layer—air sealing and bulk insulation remain the main event.
Choosing the right insulation with reflective foil
Product types and what they’re best at
-
Radiant barrier laminates/rolls: best when you can preserve a clean air space.
-
Foil-faced foam board: gives true conductive R-value plus a reflective surface.
-
Foil-faced bubble/pack products: performance is highly assembly-dependent; be extra careful about air-gap assumptions.
Fast buyer’s matrix
-
Best for: attic radiant control, metal-roof buildings, radiant reduction near ducts
-
Not ideal for: meeting code-required wall/ceiling R-values by itself
-
Specs to verify: emissivity/low-e claims, tear strength, temperature limits, and required air space for any published performance
Climate, code, and moisture risk
Radiant barriers tend to be most cost-effective in hot/sunny conditions; DOE notes that in cooler climates it’s often more cost-effective to add more thermal insulation than a radiant barrier.
Moisture caution:
-
Foil layers can behave like vapor retarders depending on construction.
-
Avoid stacking multiple low-perm layers without a clear drying path (that’s how you trap moisture).
Code varies by jurisdiction, and requirements can change with editions (for example, ICC publishes the IRC and related code content). Use local code guidance and inspector input when fire/attic rules are in play.
Accessories that make or break performance
Most failures come from shortcuts, not the roll itself:
-
wrong tape (adhesive fails in heat/dust),
-
skipped seam sealing,
-
crushed air spaces,
-
sloppy edges and penetrations.
For repeat jobs, standardizing accessory SKUs is a quality multiplier. This is a natural fit for bulk procurement: aligning foil products with the right tapes, cap fasteners, and sealants—something wholesalers like Wellco Wholesale are positioned to support for trade customers who want consistency across many installs.
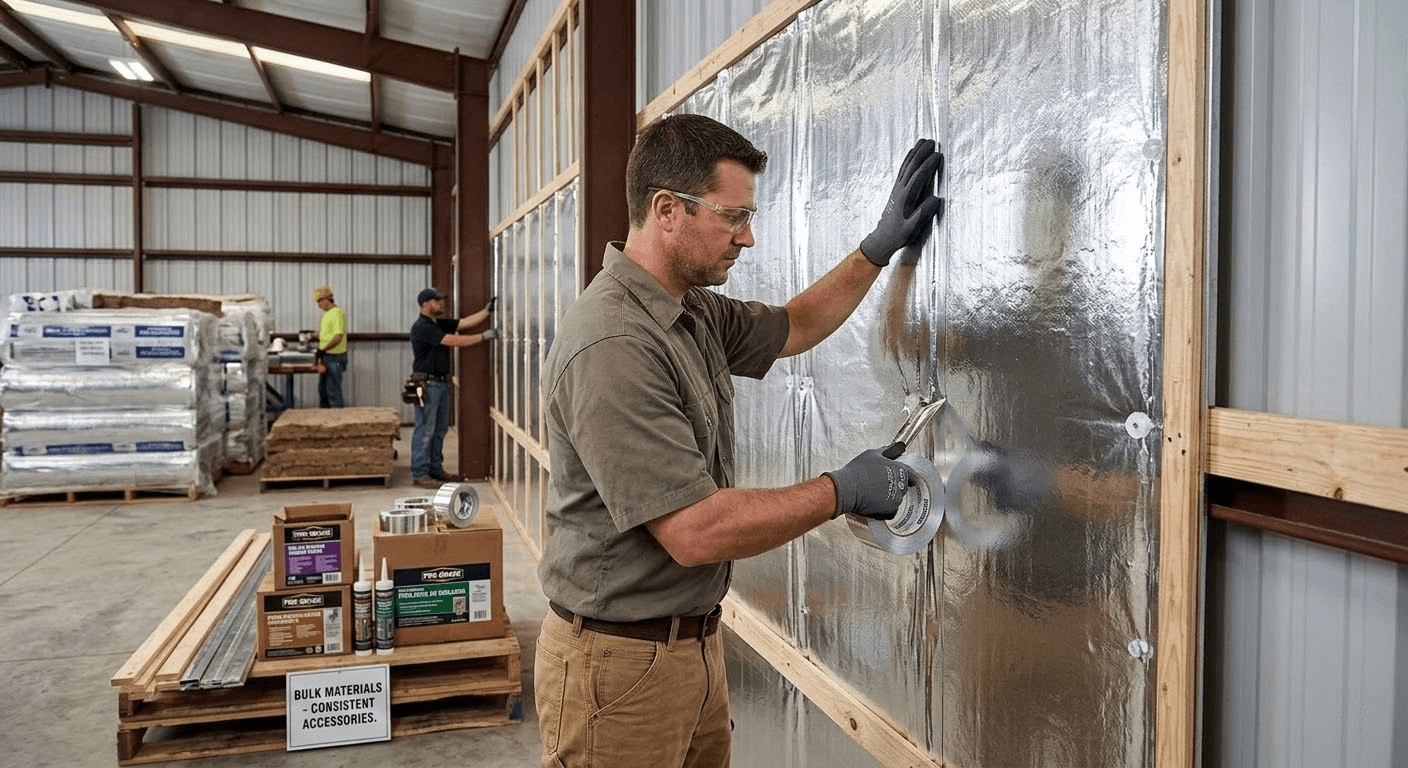
How to install insulation with reflective foil in the real world
Step-by-step workflow
-
Fix water issues first (roof leaks, bulk moisture sources).
-
Plan the air gap (furring strips/stand-offs; keep it consistent).
-
Orient the reflective face toward the air space.
-
Fasten without crushing (caps help; avoid over-stapling).
-
Tape seams and seal penetrations (wiring, pipes, framing transitions).
-
Protect ventilation paths (especially soffit/ridge in attics).
-
Walk the install and correct gaps, loose tape, and missed edges.
Building America guidance notes attic radiant barrier systems can significantly reduce radiant heat transfer across attic spaces, improving overall heat flow conditions (and energy impacts depend on climate and attic configuration).
Common mistakes to avoid
-
Foil with no air space → add furring/stand-offs; don’t flatten the cavity
-
Untaped seams → tape all joints; seal edges and penetrations
-
Blocked attic vents → maintain airflow paths; don’t staple across vent routes
-
Using foil as the only “insulation” in cold climates → pair with code-appropriate bulk insulation
-
Ignoring air leaks → air sealing often beats adding more layers
Buyer’s verification checklist
Before purchase / on delivery:
-
Emissivity (or tested radiant barrier performance context)
-
Fire/smoke ratings applicable to your use
-
Temperature limits for adhesive and facing
-
Recommended tape type and surface prep
-
Clear statement of required air-gap conditions for any published performance
After installation:
-
Air gap preserved (no crushed sections)
-
Seams taped continuously
-
No blocked ventilation
-
Edges/penetrations sealed
-
No exposed areas where damage/tearing will occur
Safety & compliance quick check
-
Ask your inspector or local authority what’s required for attic or mechanical-space applications (ignition barrier/fire rating expectations vary).
-
Keep foil away from heat sources unless rated for that exposure.
-
Don’t treat foil as a substitute for safe electrical clearances and good ventilation design.
Cost, payback, and when to choose something else
Reflective foil can be a smart spend when the problem is peak radiant load (hot roofs/attics, metal buildings, duct exposure). Field research and agency guidance typically place savings in a modest range, and strongly condition it on climate and configuration.
Choose bulk insulation (fiberglass/cellulose/foam) as the primary layer when you need:
-
high conductive R-value,
-
strong sound control,
-
robust air sealing,
-
cold-climate performance where radiant loads aren’t the main issue.
Conclusion
The best way to think about insulation with reflective foil is simple: it’s a radiant-control layer that performs when you preserve an air space, seal it like an air barrier, and respect moisture and code constraints. If your building is fighting a hot roof or sun-loaded metal shell, reflective foil can meaningfully improve comfort and reduce cooling demand. If you’re chasing code R-values or battling air leaks, start with bulk insulation and air sealing first.
If you’re buying for multiple jobs, build a standardized bill of materials (foil + the right tape + caps/fasteners + furring/stand-offs). That kind of repeatability—often supported by wholesale suppliers like Wellco Wholesale—is what turns “it should work” into “it works every time.”
Frequently Asked Questions
Does insulation with reflective foil work without an air gap?
Usually not very well. Reflective foil needs an adjacent air space to reduce radiant heat transfer; pressed tightly against a solid surface, it behaves more like a thin facing than a radiant barrier.
Is foil insulation enough to meet code-required R-values?
Most of the time, no. Reflective foil is a radiant-control layer, while code compliance typically requires conductive R-value delivered by bulk insulation (fiberglass, cellulose, foam) and proper air sealing.
Can reflective foil help with condensation in metal buildings?
It can, especially when seams are taped and transitions are sealed, because it can reduce radiant cooling of interior surfaces and limit moist air reaching cold metal. Ventilation and moisture sources still need to be addressed for reliable results.
What should I check on the spec sheet before buying?
Look for emissivity/testing context, fire/smoke ratings relevant to your use, temperature limits, and any stated air-gap assumptions behind performance claims. If those details are missing, treat big promises cautiously.
What’s the biggest installation mistake?
Crushing or eliminating the air space, followed closely by leaving seams unsealed. Both issues can erase most of the practical performance you expected.