Reflective Foil Insulation Installation: Step-by-Step Guide
Reflective foil insulation controls radiant heat—slowing heat gain in hot weather and limiting heat loss in cooler seasons—when it’s paired with properly detailed air gaps and sealed seams. It shines in attics, metal buildings, garages, and around ducts where radiant load dominates. This guide walks pros and serious DIYers through reflective foil insulation installation from planning to QA/QC, with climate notes, safety checks, and field-proven tips.
Author note: I’ve spent 9+ years working on building envelopes from post-frame shops to multifamily rehabs; the steps below reflect what crews actually do on ladders.
Resource note: As a one-stop, factory-direct wholesaler, Wellco Wholesale supplies trade packs of foil rolls, UL-listed tapes, fasteners, and accessories across agricultural, landscaping, and light building jobs—handy when you need the same spec across multiple sites.
How Reflective Foil Insulation Works (and Where It Shines)
Radiant vs. Conductive/Convective Heat Transfer
Foil is a low-emissivity surface that reflects radiant energy and limits re-radiation. For performance, it must face an air space; when it’s pressed tight to a hot surface, it behaves like a thin conductor with little radiant benefit. Typical clean foil emissivity is 0.03–0.05 (≈95–97% reflectivity) when facing an air gap.
Installer reminder: “No air gap, no radiant performance—treat that void as part of the assembly.”
Climate & Assembly Fit (IECC-style guidance)
-
Hot/hot-humid (Zones 1–3): High benefit in vented attics and under metal roofs; pair with venting to purge heat.
-
Mixed (Zones 4–5): Useful under sun-loaded roofs, pole barns, and garages; combine with code-level batts/blown-in for conductive R.
-
Cold/cold-dry (Zones 6–8): Benefits are smaller; prioritize continuous insulation and air sealing. If used, detail carefully to avoid winter condensation.
Best matches: vented attics, post-frame/metal buildings, garages/workshops, warehouses, and HVAC duct wraps.
Codes, Safety, and Planning Before You Start
Code & Rating Basics
-
Verify ASTM E84 (surface burning) on labels; most “Class A/1” products list FSI ≤ 25 and SDI ≤ 450.
-
Check vapor retarder class on the datasheet: many bubble/foam cores are Class I–II (≤0.1–1.0 perms).
-
Respect clearances around recessed lights and flues per the fixture/appliance listing.
Moisture & Ventilation Strategy
Preserve soffit-to-ridge pathways with baffles, shingle laps for drainage, and avoid sandwiching low-perm layers on both sides of sheathing. On metal buildings, include a condensation plan (venting, thermal breaks, or drainage planes).
Tools, Materials & Takeoff
-
Foil rolls: reinforced scrim, single/double bubble, or foam core
-
UL-listed foil tape, compatible sealants, cap staples/washered fasteners, or furring
-
Utility knives/shears, staplers, chalk line, baffles, PPE
Takeoff tip: Add 8–12% waste for cuts/terminations; trussed roofs with many penetrations may need more. Tapes/sealants often run 5–10% of material cost on tight, high-performance installs.
Step-by-Step Installation: Attics
Rafters (Vented Roofs)
-
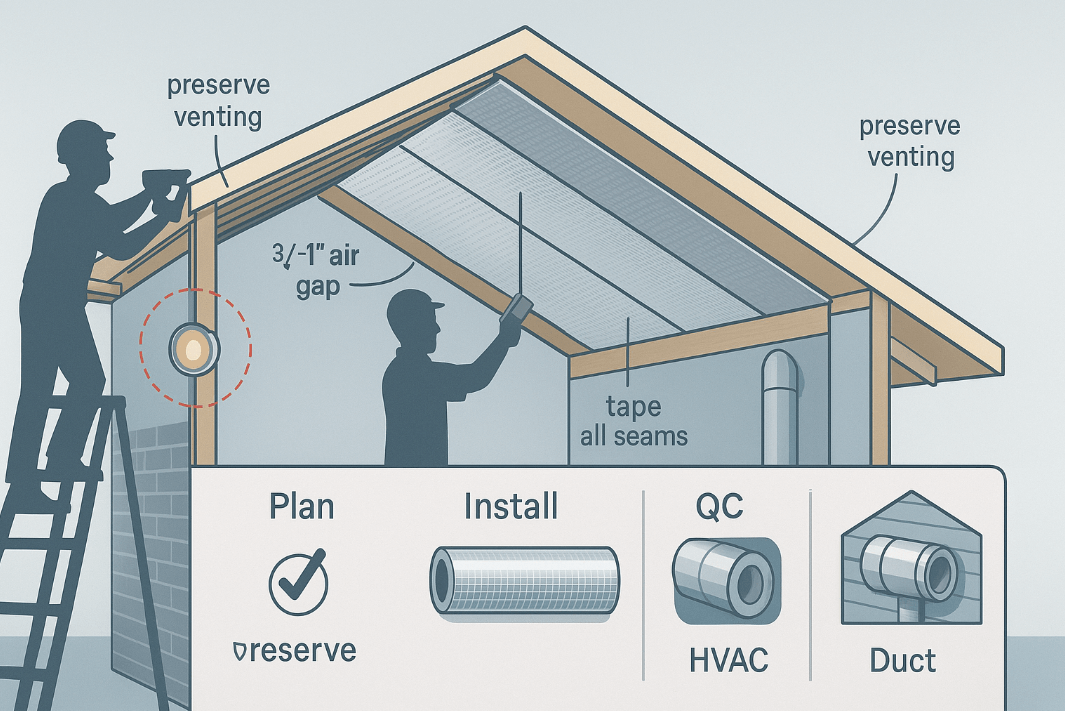
Prep & airflow: Confirm clear soffit/ridge venting; install baffles at eaves.
-
Layout: Run foil perpendicular to rafters, maintaining a ¾–1 in continuous air gap.
-
Fasten: Staple to the rafter sides or bottoms; do not block channels.
-
Seal: Tape every seam and terminate edges; seal around penetrations.
-
Safe distances: Maintain listed clearances at can lights/flues.
What “good” looks like: Continuous gap you can trace from soffit to ridge, flat tensioned foil (no belly sags), every seam taped, baffles visible at eaves.
Attic Floors (Selective Use)
If used over joists, leave service walkways, keep non-IC fixtures uncovered, and plan light cleanings—dust on upward-facing foil reduces reflectivity.
Step-by-Step Installation: Walls & Metal Buildings
Stud Walls (New & Retrofit)
-
New build: Foil on the interior face with furring (to preserve the air space), then drywall.
-
Retrofit: Over existing drywall, add furring + foil + finish where depth allows.
-
Combine with fiberglass/mineral wool for conductive R while protecting the radiant space.
Post-Frame / Metal Panels
-
Install foil over girts/purlins as a thermal break, tape all overlaps, and shingle laps.
-
Use washered fasteners to prevent tear-through; keep the foil off the metal skin to preserve the radiant function.
-
Integrate drip edges/drainage so any condensate can exit.
Common mistake: Pinning foil tight to metal turns it into a shiny conductor—radiant performance collapses.
Step-by-Step Installation: Garages, Doors & Crawlspaces
Garage Doors
Template each panel, attach low-profile foil evenly, and verify door balance. Heavier retrofits can require spring adjustments by a qualified tech.
Crawlspaces & Rim Joists
Face foil toward the interior air space and seal edges. In termite regions, leave the inspection gap required by code. Coordinate with ground vapor barriers to control soil moisture.
Step-by-Step Installation: HVAC Ducts & Hot Surfaces
Duct Wrap
Wrap without compressing interior insulation, align and tape spiral/long seams, and support long runs with hangers to prevent sagging.
Safety Clearances
Foil is not a shield to violate clearances. Follow appliance/flue listings and local code; document clearances with closeout photos.
Specs at a Glance (for Submittals)
| Parameter | Typical Range / Note |
|---|---|
| Emissivity / Reflectivity | 0.03–0.05 emissivity (≈95–97% reflectivity) when clean and facing an air space |
| Thickness | ≈ 2–8 mm (bubble/foam cores), thinner for scrim-reinforced foils |
| ASTM E84 | Many products qualify Class A/1 (verify label) |
| Vapor Retarder Class | Often Class I–II (≤0.1–1.0 perms); check datasheet |
| Tape Compatibility | Use UL-listed foil tapes per manufacturer |
| Required Air Gap | ¾–1 in continuous for radiant function |
(Generalized specs; always verify the exact product data sheet.)
Quality Control, Testing & Performance
Post-Install Checklist
-
All seams taped; edges terminated and sealed
-
Air gaps preserved; no contact where a gap is required
-
Vent paths open; baffles intact
-
Clearances labeled and photographed
Verifying Results
Quick wins include IR spot checks during peak sun, tracking attic vs. hallway temperatures, and coordinating with blower-door or duct-leak tests to quantify whole-building gains. In hot roof assemblies with good ventilation, crews often record 10–20°F lower foil-facing surface temps at peak sun.
Mini Case Study (Anonymous, Metal Workshop)
Scope: 5,000 sq ft post-frame shop; reinforced foil over girts, taped seams, new panels. Crew: 3 installers, ~2 days. Outcome: Peak interior temp dropped ~12–15°F. Payback: 2.5–3.5 years assuming $0.15/kWh, 6 summer hours/day of reduced fan runtime, and 120 hot days/year. Photos and a punch-list closeout were provided to the owner.
Limits & Gotchas (Read Before You Roll)
-
Dust kills performance on upward-facing foil—plan access for periodic cleaning.
-
No gap = no radiant benefit; compression against sheathing or metal defeats the point.
-
Mind condensation in cold climates or unvented roofs; coordinate perm ratings and ventilation.
-
Non-IC fixtures and flues require listed clearances—never “wrap” heat sources.
-
Mixed assemblies (low-perm both sides) can trap moisture; design the drying path.
Seasonal Maintenance
Do a spring check (post-pollen) and late-summer check: confirm tape adhesion, baffle integrity, and that nothing now touches the foil where an air space is required. Small annual touch-ups typically cost <1% of initial materials and keep performance steady.
Sourcing & Bulk-Buy Tips (Value-Add)
Choosing the Right Roll & Accessories
Match roll type to the assembly (reinforced for durability; bubble/foam cores where a built-in spacer helps). Confirm tape compatibility and stock extra tapes/sealants. Store rolls upright and dry to prevent edge damage.
Where to Buy
Trade buyers often prefer consolidated pallets with matched tapes/fasteners and simple submittals. Wellco Wholesale supports bulk and mixed-pallet orders for garden, farm, and light building uses—useful for crews standardizing SKUs across multiple jobs without chasing parts.
Conclusion & Simple Action Plan
-
Verify code labels and plan ventilation. 2) Preserve a continuous ¾–1 in air gap. 3) Tape every seam and document clearances. 4) Pair with the right conductive R for your climate zone. If you’re kitting multiple sites, coordinate matched rolls, tapes, and fasteners; Wellco Wholesale can assemble trade-ready packs to keep crews moving.
Frequently Asked Questions
1) Does reflective foil replace fiberglass or spray foam?
No. It primarily targets radiant heat. In most climate zones you’ll still need code-level conductive R (batts, blown-in, rigid, or spray foam) for full compliance and comfort.
2) Which side should the foil face?
Orientation matters less than preserving an air space on at least one side. Foil can face either direction as long as the radiant surface faces a gap and seams are sealed.
3) Will foil cause condensation on metal roofs?
Not if detailed correctly. Maintain ventilation, shingle laps for drainage, and avoid trapping moisture between two low-perm layers. In cold climates, confirm the vapor retarder class and drying path.
4) Can I put foil over existing attic insulation?
You can install it to rafters above existing insulation (maintaining the air gap) or carefully across joists with service paths and fixture clearances. Upward-facing foil will need occasional dusting.
5) How much tape do I need?
A practical rule is 1 roll of UL-listed foil tape per 100–150 sq ft of complicated detailing, less for simple, long runs. Order extra for penetrations and terminations.